|
Previous:
Test setup < > Next:
Resolution and resolving power
Index of this page
Visual inspection of film
I decided to do a quick visual inspection of the developed
films first. Now although viewing of the film through a 10x loop
can already reveal some first impressions of accuracy of focusing
and (size of) grain structure, these low ISO film are not particularly
suited for such an evaluation, due to their very fine grain. However,
since I do not own a microscope, I therefore decided to put all
films in my Durst M670 BW enlarger, setting the enlargers head in
it's highest position for maximum magnification. Using a grain focus
finder thus allowed me to examine the grain structure in much more
accurate way. A quick dirty calculation based on the actual size
of some of the test patterns on the test chart showed me this equated
to roughly a 75x magnification. The Kodak Ektar 100 film proved
to have a very fine grain structure indeed, but Velvia 100 seemed
to be on par with it. If I had to make a grain size ranking based
on this visual inspection, it would look like this:
- Kodak Ektar 100 / Fuji Velvia 100 - finest grain
- Kodak Portra 160VC
- Kodak TMax 100 - coarsest grain
Of course, comparing silver grain based B&W film
like Kodak TMax 100 with dye based color negative / positive films
is difficult, as the dye clouds of color films have smooth, diffuse
and thus indistinct edges, whereas the silver grains of B&W
film, at least at these magnifications, tend to appear solid and
hard edged, causing a more distinct and coarser looking grain pattern.
In addition, there are many different ways to develop
B&W film, using special developers, that may lead to much finer
grain or smoother edge contrast, like specially developed fine grain
developers and staining developers. Using standard Kodak D76 developer
in accordance with Kodak recommended standard development will probably
not lead to the finest grain result. Yet my intention was not to
achieve the finest grain possible from TMax 100 at all cost, but
rather to mimic an average photographer's result of this film.
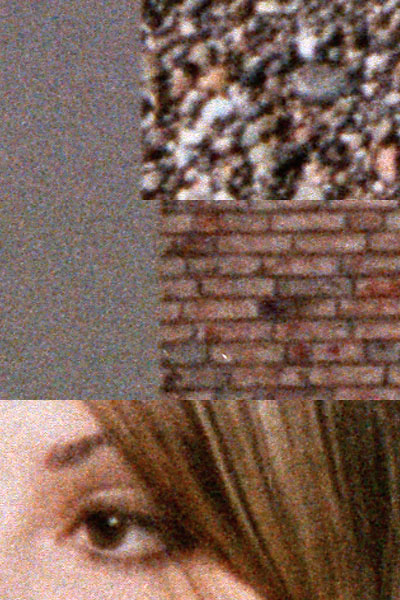
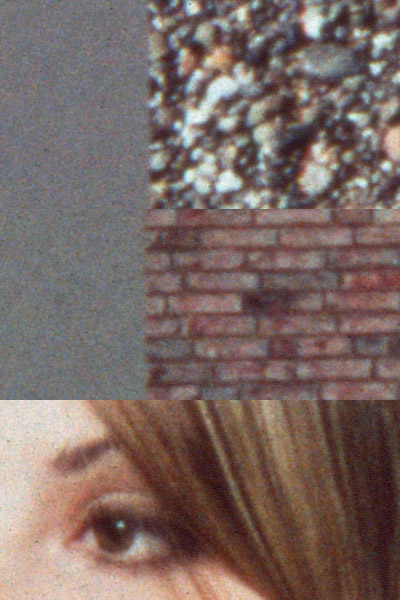
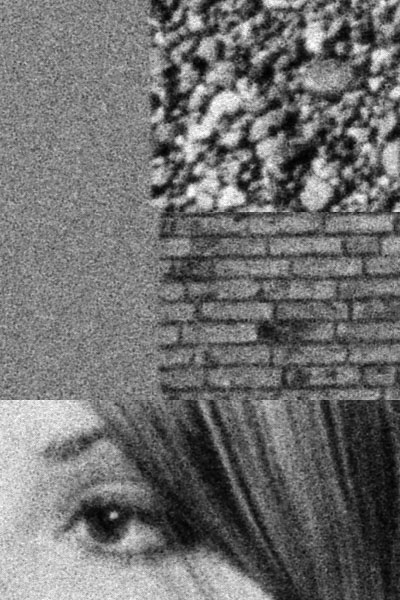
Analysis of grain structure
To judge the size and structure of the filmgrain / dyeclouds
of Ektar 100 and the other films in this test, I have included a
number of actual pixel, 100% viewing crops below. Each film's image
represents three crops from different parts of the test chart. I
included bits of the smooth "grey" background of the test
chart as well. As you can see from the images, what may appear grainy
on such a smooth background, actually doesn't have to look bad in
an actual photo. Just look at the difference between the smooth
areas and the crops of pebbles and the wall. Do also notice there
is quite a lot of color noise in these images, especially the ones
of the color negative films Ektar and Portra, more on this topic
in one of the next pages.
All results at the full 8000 ppi scanning resolution.
To make the judgment of the grain structure a bit more easy, I have
sharpened all of these scans in Photoshop using Unsharp Maks and
the following settings:
- Amount: 200
- Radius: 0.7
- Threshold: 2
Now in most cases, this is slightly beyond what I would
consider a save level of sharpening, but it helps to bring out the
grain structure, and that is the main goal of this section. And
as you can see with some of these scans, like the ones from Ektar
100 and Velvia 100, it actually doesn't yet cross the border of
ruining the image. These images still look relatively smooth, especially
Velvia 100.
Do note though, that at 8000 ppi, we are reaching the
absolute limits of what 100 ISO film can deliver. I would normally
scan these films at a more realistic 2000 to 4000 ppi maximum, leading
to a much more smooth and pleasing scanresult.
|
Kodak Ektar 100
|
Kodak Portra 160VC
|
 |
 |
|
Fuji Velvia 100
|
Kodak TMax 100
|
 |
 |
As you can see from these crops, my initial impressions
from the visual inspection of the 4 film types is quite good. The
ranking I made still holds, with Kodak TMax 100 being the coarsest
grain, Kodak Portra 160VC intermediate, and Kodak Ektar 100 and
Fuji Velvia 100 finest grain. Interestingly though, the scan of
Velvia 100 slide film appears much more smooth, although the dye
clouds don't appear to be much finer than the second best film,
Ektar 100, especially judging the visible structure in the smooth
grey background areas. So what might cause this? Well, have you
ever had a real good look at color negative film? Of course you've
noticed it just looks brown / orange, but did you realize the consequences
of that? There is one aspect in favor of slide film scanning: slide
film has a full contrast range from pure black to white, whereas
color negative film only has a very limited range of colors to be
scanned. Just look at the examples below:
|
Kodak Ektar 100 negative
Limited range of colors in a color negative, no
black and white
|
 |
Fuji Velvia 100 slide
Full range of colors in slide film, from dense
black to white (blank film)
|
 |
Kodak TMax 100 negative
Large dynamic range from dense black to white
(blank film). Please note that this image does not contain
any real highlights, so the deepest blacks of a B&W negative
at highest silver density are not visible in this example.
|
Now a scanner doesn't need to do a lot to faithfully
reproduce a slide, besides capturing the pixels. However, with color
negative film, the limited contrast range of the original negative
needs to be expanded to a full contrast range from the deepest black
to pure white. It is the equivalent of stretching an elastic band
10x. Now each tiny error in determining the exact value of the Red/Green/Blue
(RGB) values of the pixels of a color negative gets expanded / exaggerated
as well in the process. Hence, almost inevitably, a high resolution
scan result of color negative will look a bit more "grainy"
as well, as these pixel errors have been enhanced as well. I think
this is the main reason why the Velvia 100 results looks more smooth,
compared to Ektar 100.
It is also the reason why it's so important to have
dedicated color calibration profiles for each and every color negative
film being scanned with a certain scanner, whereas for slide film
this is less of an issue. If the color calibration profile doesn't
match the contrast range and color saturation of the specific color
negative film, the scan's colors will inevitably be "off"
/ wrong.
In addition to this, it is in this area of very accurate
RGB pixelvalue scan results, that a drum scanner probably would
beat the Imacon, and deliver more smooth results, especially combined
with the ability of a drum scan to "hide" grain by changing
the aperture of the photo multiplier tube rig. See this excellent
reference for a more thorough discussion of different scanner designs
and drum scanners specifically: Film
Grain, Resolution and Fundamental Film Particles by Tim Vitale.
Previous:
Test setup < > Next:
Resolution and resolving power
|


