|
Previous:
Color< > Next:
Actual size versus actual pixels
Index of this page
Image quality
After the different aspects discussed so far, it's time
to concentrate on one last aspect, that is "image quality".
Now of course this is a broad term, so to make a meaningful comparison
between the different films, I set a goal:
"How good do the films and digital shot reproduce
all of the details in the original test chart?"
So, if we assume our goal is to reproduce the test chart
on it's original size (60 x 90 cm) by printing it based on these
scans and digital capture, how much detail will be lost (if any)?
So we strive for a 1:1 reproduction here.
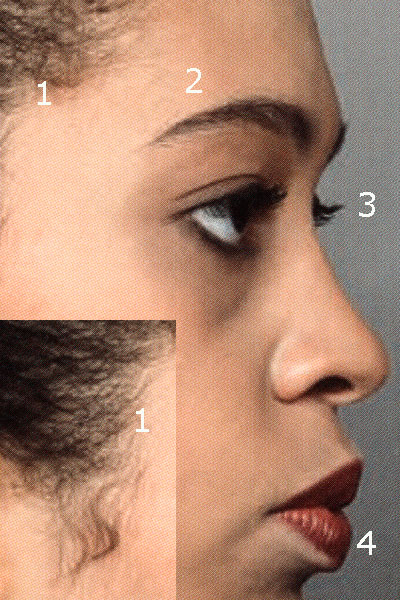
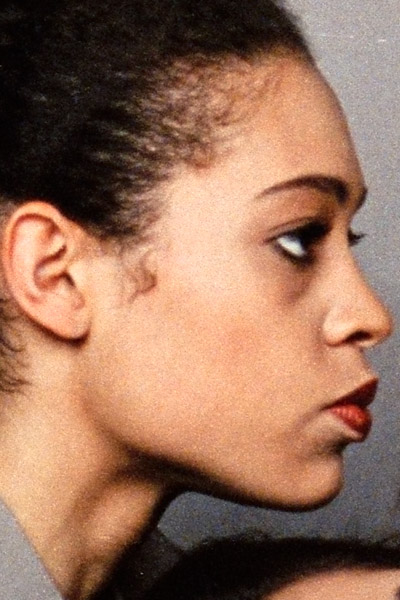
Now, to see how well these scans reproduce the original
test chart, I show a section of a direct flatbed scan (Canon 9950F)
for comparison. This scan was made on a 300 ppi (pixels-per-inch)
resolution, and as you can see, it already starts to reveal the
test chart's offset screen printing pattern. So this scan represents
the maximum quality to be expected from the film scans. All of the
images below are again at "actual pixels" (100% viewing)
level, so each captured pixel is truly visible. Do note though,
that the crops presented here are actually enlargements compared
to the 60 x 90 cm test chart because of this "actual pixels"
level viewing. To see the scans matched to the exact size of 60
x 90 cm, see the next
page.
In the direct scan, I have marked four important details:
1 - hair detail
2 - eyebrow detail
3 - eyelash detail
4 - lip detail
To reveal these details optimally, I have sharpened
all of the images compared to the unsharpened scans, as it helps
bring out the detail and makes the comparison with the in-camera
sharpened Alpha 900 image more fair. All film scans are 4525 ppi,
downscaled from the original 8000 ppi scans using bicubic interpolation
in Photoshop. Downscaling them to a size similar to the Alpha 900
shot makes the comparison easier, while the fact that were talking
about a downscaling of a much bigger scan, means we are not
"inventing" new pixels as in an upscaled interpolation
from a lower resolution image, but rather emphasizing and using
all of the captured detail of the original 8000 ppi scans. Downscaling
from such high resolution scans, also helps decreasing the grain
and noise pattern a bit.
I have now also included two extra crops for Kodak Ektar
100 and Kodak Portra 160VC. The left images represents the original
scan results, the right after color noise reduction, which combats
the usual red/green color noise typical and visible in these extreme
high resolution color negative scans. No noise reduction was applied
to the Fuji Velvia 100 image, as this scan already had a low color
noise level. If you are not familiar with digital image processing,
you may wish to skip the next paragraph and just go on to view the
images, as it may be a bit to cryptical.
Color noise reduction was achieved by converting the
images to LAB color mode, and than applying a mild Gaussian blur
with a radius of 5 pixels to the A and B color channels, after which
both of these channels were sharpened up again to prevent color
bleeding. The advantage of this method of color noise reduction
is that it hardly affects image detail, as that is for the most
part contained in the untreated L or Lightness channel of LAB color
mode. It is about similar to what Photoshop's "reduce noise"
filter does when set to remove color noise only. Overall sharpening
was achieved by sharpening up the L or Lightness channel. The effect
of the color noise reduction is especially visible in the grey background.
I may go deeper into this subject of color noise and noise reduction
in a later technical article.
|
Direct flatbed scan of test chart (Canon 9950F)
|
Kodak TMax 100
|
 |
 |
|
Kodak Portra 160VC
|
Kodak Portra 160VC - NOISE
REDUCTION
|
 |
 |
|
Kodak Ektar 100
|
Kodak Ektar 100 - NOISE
REDUCTION
|
 |
 |
|
Fuji Velvia 100
|
Sony Alpha 900
|
 |
 |
Now looking at the direct scan and comparing the different
images with it:
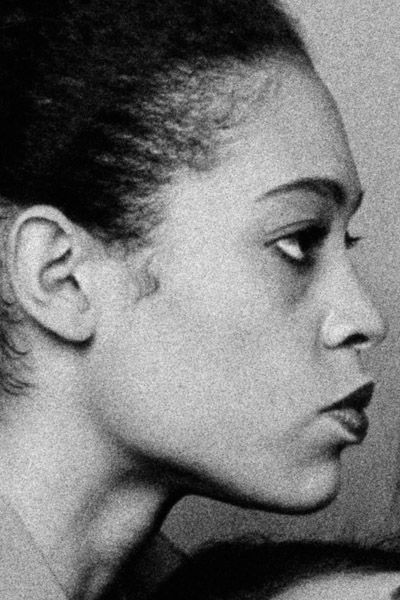
Kodak TMax 100:
Loss of detail in hair (1) compared to direct scan.
Just very faint detail in eyebrows and eyelashes (2 and 3). Lips
reveal some of the highlight detail.
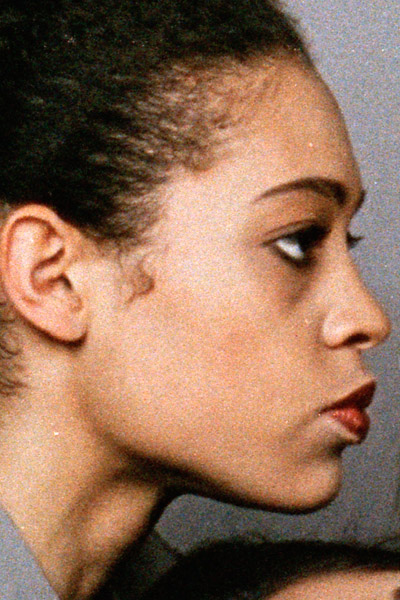
Kodak Portra 160VC:
Loss of detail in hair (1) compared to direct scan.
However, light thin hair details better defined than in TMax 100.
Just very faint detail in eyebrows and eyelashes (2 and 3). Lips
reveal some of the highlight detail. Slightly less grainy than TMax
100, but more grainy than Ektar 100.
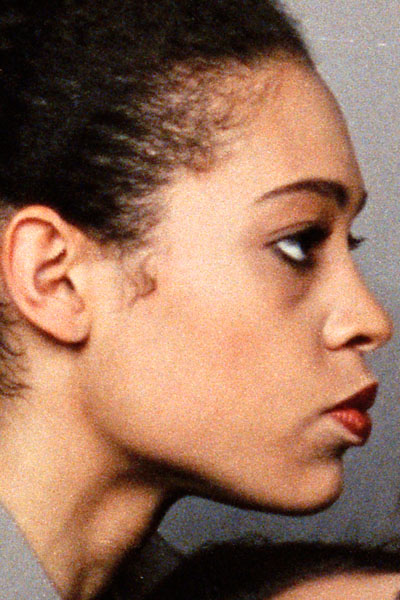
Kodak Ektar 100:
Some loss of detail in hair (1) compared to direct scan.
Just very faint detail in eyebrows and eyelashes (2 and 3). Lips
reveal some of the highlight detail. Actually, despite the visibly
finer grain, difficult to distinguish in terms of detail compared
to Portra. I still wonder if I got the focus 100% right?
Fuji Velvia 100:
Some loss of detail in hair (1), however overall better
rendition of hair detail. Of all films most visible detail in eyebrows
and eyelashes (2 and 3), better separation of eyelashes. Lips clearly
reveal some of the highlight detail (4), even the two most right
situated highlights are separated.
Overall, the differences are now smaller than before
with the new scans. Especially the color negative films, despite
showing a more visible grain, have benefited.
Sony Alpha 900:
Some loss of detail in hair (1), however the least.
Visible detail in eyebrows and eyelashes are (2 and 3). Lips clearly
reveal some of the highlight detail (4), even the two most right
situated highlights are separated. Best detail overall, very fine
rendition of hair.
Previous:
Color< > Next:
Actual size versus actual pixels
|


